Yarnluma

Gather your materials
- Smooth medium-weight yarn suitable for the intended use; choose the fiber by its care label. Color A is the main color.
- A 5 mm hook as a starting point, adjusted to suit your measured gauge and desired fabric.
- Tapestry needle, scissors, ruler, and two removable stitch markers.
- The intended object or surface, if fitting a cover, sleeve, or mat.
We do not invent a tested yarn quantity. Use the swatch-based yarn planner with your own sample weight, including an allowance for seams and ends.
Let’s work through it
Make a swatch first
Use a smooth medium-weight yarn and a 5 mm hook as a starting point. Work a swatch larger than 10 × 10 cm in single crochet. The calculation example uses 16 stitches and 18 rows per 10 cm. This is an assumed planning gauge, not a measured sample result. Change the counts using your own swatch if it differs.
Begin the foundation
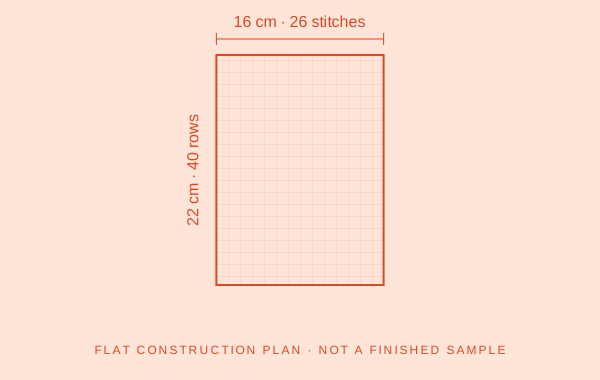
Chain 27 loosely. Single crochet in the second chain from the hook, then work one sc in each remaining chain. You should have 26 stitches. The skipped chain and turning chain do not count as stitches.
Build the panel
For rows 2–40, chain 1, turn, and work one sc in each stitch across, starting in the first actual stitch. Finish in the last actual stitch, not in the turning chain. Keep 26 stitches in every row. Use a single color unless you deliberately plan and record a variation.
Pause and measure
After several rows, lay the fabric down without pulling and check the width. At the assumed gauge, 26 stitches produce about 16.3 cm and 40 rows about 22.2 cm. The nominal 16 × 22 cm dimensions are rounded. Seams and folds will change the final usable size.
Finish and assemble
With the 22 cm dimension running left to right, fold each end 10 cm toward the center to leave a 2 cm slit. Seam the two short ends through the folded layers. Slide the packet through the central opening.
Check before using
Keep tissues in their original packet so loose fibers do not contact them.
If it feels a little off
Packet sizes vary. Pin the cover around your packet and adjust before sewing.
If the count is right but the size is wrong, measure the swatch again before blaming the row instructions. A different yarn or a tighter afternoon’s tension can change the panel. If the count is wrong, check both edges before continuing. It is usually less frustrating to undo two rows now than twenty later.
Make the size work for you
Enter your measured gauge and your desired flat-panel dimensions in the panel calculator. This plain stitch uses a multiple of one. Add one foundation chain after calculating the desired stitch count. Keep any fold or seam allowance separate from the finished size. Write down the changes in your notebook so you can reproduce them.
Questions worth asking
Can I use the yarn already in my basket?
Possibly. Make a swatch, check the fabric for the intended purpose, and recalculate. Keeping the same stitch count with a different gauge changes the dimensions.
Does the turning chain count?
No. In this plan it does not count. Work the first and last actual stitches of every row.
Is the drawing a tested finished result?
No. It is a flat construction diagram. The plan is not physically sample-tested; the assembly and yarn behavior still need a maker’s check.